
 Boot Arguments, Bios and Drivers… OH MY!! Perhaps you’re thinking, “Nerd!”, or possibly, “GEEK!!” — call me what you want, but my computer kicks ARSE! It’s fast… like, REALLY fast, especially compared to the last-updated-in-2008 (the “update” in ’12 doesn’t count) Mac Pro that I could have purchased for another $1,325! Where I come from, that ain’t pocket change foo! Anyway, I thought I’d post about this build in the event that someone out there has purchased the same hardware I have and is having trouble, like I did, getting it to all play nicely together.
HARDWARE
Case:
Corsair Carbide Series 500R (White)
CPU:
Intel Core i7 3770
Motherboard:
Gigabyte GA-Z77X-UD5H Socket 1155 (rev. 1.1)
Graphics:
EVGA GeForce GTX 660Ti
Power Supply:
Corsair Enthusiast Series TX650
Hard drives:
SanDisk Extreme SSD 120GB SATA
Seagate Barracuda 1TB HDD SATA
Memory:
Corsair Vengeance LP 16GB (8GB x 2) 1333MHz DDR3
Bluetooth Adapter:
Iogear USB Bluetooth 4.0
Total build cost $1,174.77 (including shipping)
My purchases were split between Amazon.com and NewEgg.com, both of whom shipped to my APO address! I have a special place in my heart for companies that ship to APOs! 🙂
Already Owned:
Monitor:
HP ZR24W Display
Keyboard:
Apple Wireless Keyboard
Mouse:
Apple Wireless Trackpad
HOW IT WORKED
I preformed many variations of the installation (about 5 of them) until I finally got the system working properly. In the paragraphs below I will focus on the two installations that worked (one preformed on the 120GB SSD and one on the 1TB HDD). These are the exact steps that it took to get everything running smoothly:
1TB HDD installation:
After creating a UniBeast flash drive*, I installed OS X 10.8.3 (Mountain Lion) as instructed by TonyMacOSX86.com with the graphics card, I had purchased, installed. The UEFI settings were selected as instructed by TonyMacOSX86.com. After the initial installation of the OS I was able to get the computer restarted in safe mode (-x) and I was able to run MultiBeast. After installing the drivers listed below, I ended up with a boot 0 error. This error was fixed by starting up in UniBeast and unmounting the OS’s disk via Disk Utility, once the disk was unmounted, I opened the Terminal and typed in the following code:
dd if=/usr/standalone/i386/boot1h of=/dev/disk0s2
and hit Enter (Please note that my OS was installed on “disk0s2”, yours may differ (that information can be found in Disk Utility)). I then shut down the computer and upon startup the computer operated properly. It is to my knowledge that boot0 error is caused by the change of the hard drive’s default block size from 512 bytes to 4,096 bytes. These new, larger drives are known as “Advanced Format” or 4K drives. You can read more about it and get the TonyMacX86 “Official boot0 Error Guide” here. Once I completed that and restarted, my computer worked fine. I then decided to reinstall everything on the SSD so that my applications and system would work faster.
* Make sure that when you install the UniBeast application on your flash drive, the OS matches the OS you will be installing on your new system. I may or may not have made that mistake… 😉
120GB SSD installation:
After creating a UniBeast flash drive, I installed OS X 10.8.3 (Mountain Lion) as instructed by TonyMacOSX86.com with the graphics card, I had purchased, installed. The UEFI settings were selected as instructed by TonyMacOSX86.com. After the initial installation of the OS I was able to get the computer restarted in safe mode (-x) and I was able to run MultiBeast. I then proceeded to install the drivers listed below using MultiBeast. After restarting the computer I went back into the UEFI settings and disabled VT-d. I rebooted once more and everything has been working perfectly ever since.
Drivers used:
The only drivers installed from MultiBeast 5.3.0 (UniBeast and MultiBeast can be downloaded for free from TonyMacX86.com only after creating a free account):
- User DSDT or DSDT-Free Installation
- Drivers & Bootloaders>Drivers>Audio>Without DSDT>ALC898
- Drivers & Bootloaders>Drivers>Network>Atheros – Shailua’s ALXEthernet v1.0.2
- Drivers & Bootloaders>Drivers>Network>Intel – hank’s AppleIntelE1000e v2.1.7
- Customization>Boot Options>GraphicsEnabler=No
Issues encountered after the build:
The only issue I have encountered thus far, is what you see below:
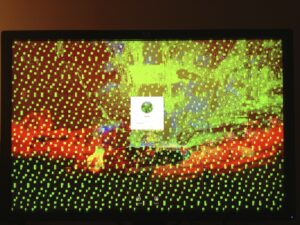
It appears to be a graphics error and only occasionally occurs when I wake it from sleep mode. I usually have to restart the computer (one time it seemed to have fixed itself within a few seconds). Either way, I don’t consider it a large enough problem to find an answer for just yet (it’s only happened about three times in the past month and a half). If I end up finding a fix for it further down the road, I’ll be sure to update this post.
Well, I hope this post will either inspire someone out there to hack together a build of their own, or assist someone who happened to purchase the same hardware as I have with their problems. 🙂 Good luck, or as the Japanese would say, “Ganbatte!”
